


Hey there! If you’re reading this, you’re probably tired of flickering old ceiling lights, paying crazy high energy bills, or just ready to give your space that sleek, modern upgrade recessed LED spots bring. As someone who’s been in the LED lighting game for years—watching folks hack their own installations, mess up compatibility, or buy the wrong bulbs because they didn’t do their homework—I’ve seen it all. Today, I’m breaking down exactly how to install LED spots in a recessed ceiling like a pro, no electrician required (well, mostly—safety first, always). Let’s jump in.
First things first: before you grab a ladder, a screwdriver, and a bunch of wires, you’ve got to pick the right LED spots for your recessed fixtures. This is make-or-break—using a bulb that doesn’t fit, or that’s incompatible with your housing, will leave you frustrated faster than a dimmer that won’t sync. Let’s talk common options because I get it, the bulb aisle (or website) can feel like a foreign language.
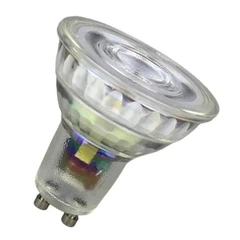
If your recessed housing takes a standard MR16, two popular picks are our Mr16 Narrow Spot and Mr16 Smd Led Bulbs. The narrow spot is perfect if you need targeted light—like for highlighting a piece of art, a kitchen backsplash, or a cozy reading nook. It has that tight beam angle that keeps light where you want it, not spilling all over the place. The SMD MR16 is more versatile for general room lighting, with even spread and that energy efficiency that cuts your electricity bill. Then there’s the bigger Ar111 style—great if you have a larger recessed fixture (common in living rooms or open-concept spaces) that needs more brightness. Our Ar111 Spotlight is a direct replacement for old halogen Ar111s, and if you’re specifically looking to swap out those hot, energy-hungry halogens, check out the Ar111 Led Replacement — they’re made to fit exactly like the old ones, no modifications needed. And don’t forget to check your base size! If your recessed fixture uses E14, our E14 Led Spot Bulb is a direct fit, no adapters needed. Pro tip: write down your housing model, bulb base, and desired beam angle before you shop—saves you a return trip (we’ve all been there).
Now, safety. I can’t stress this enough—turn off the power to the ceiling lights at the circuit breaker. Seriously, I’ve heard too many horror stories of folks grabbing a bulb while the wires are live and getting a jolt that made them drop the ladder. Give the switch a test to be 100% sure it’s off. If you’re nervous about working with wires, don’t hesitate to call a licensed electrician—better safe than sorry. Okay, moving on to the installation steps, assuming you’re good to go with basic electrical work.
First step: Gather your tools. You don’t need a fancy toolbox—just a ladder (stable, not wobbly—ask a friend to hold it if you’re working high up), a screwdriver (Phillips and flathead, depending on your fixture), wire strippers, a voltage tester (trust me, worth the $10), and your new LED spots. If you’re swapping old halogens for LEDs, you might also want a small towel to catch any dead bulbs, which can be a bit janky to pull out.
Second step: Remove the old trim and bulb. Most recessed fixtures have a trim that twists or snaps off—you just grab the edges and turn it counterclockwise, or pull gently if it’s a snap-in style. Once the trim is off, you’ll see the old bulb and the two wires connected to the fixture (black and white, usually, plus a green ground wire). Unclip the old bulb, and if you’re swapping the whole thing? Wait no, wait—if you’re just replacing the bulb, skip removing the fixture, just disconnect the old bulb’s wires. If you’re upgrading the entire housing (unlikely unless it’s super old), that’s a different job, but 9 times out of 10, you’re swapping bulbs.
Third step: Prep the new LED spot. Wait—are your LEDs dimmable? This is another common mistake. If you have a dimmer switch, you need to make sure your new LED is dimmable. Most of our bulbs (including those MR16s and Ar111s I mentioned) are dimmable, but double-check the product page. If your dimmer is old, you might need to replace it with an LED-compatible dimmer—otherwise, you’ll get flickering or the lights won’t dim evenly.
Fourth step: Connect the wires. This is the part that scares most people, but it’s super simple. Take your new LED bulb’s wires, and match them up to the fixture wires: black to black, white to white, green to green (the ground wire, usually a bare copper or green wire). Use wire nuts to twist them together tightly—make sure there’s no loose wire exposed, because that can cause a short circuit. If your fixture has built-in clips (most recessed ones do), once the wires are connected, tuck them neatly into the housing so they don’t get pinched when you reattach the trim.
Fifth step: Mount the new bulb and trim. If you’re using an MR16, just push it into the socket until it clicks. For Ar111s, line up the pins on the bulb with the slots in the socket and twist it until it’s secure. Then, snap or twist the trim back into place—make sure it’s flush with the ceiling, no gaps. Give it a gentle tug to make sure it’s not loose.
Sixth step: Turn the power back on at the circuit breaker, then flip the light switch. Congratulations—your new LED spots should be on, bright, and working. If it doesn’t turn on at all, double-check the wire connections (make sure they’re tight, matched correctly) and that the power is definitely on. If it’s flickering, that’s probably a dimmer issue—either the dimmer isn’t LED-compatible, or you have a non-dimmable bulb on a dimmer switch. Easy fix: swap out the bulb or the dimmer.


Wait, hold on—what if you’re installing new recessed housing, not just swapping bulbs? That’s a bit more involved, but still doable for DIYers with some basic skills. If your ceiling is drywall, you’ll need to cut a hole (the size depends on your housing—usually 4 or 6 inches, marked on the housing’s packaging). Then, secure the housing to the ceiling joists with screws, run the wires from the junction box to the housing, connect the wires, and then attach the trim and bulb. But honestly, most people are swapping old bulbs, not installing new housings, so I’ll keep that quick for now—just make sure your housing is rated for the type of bulb you’re using (like IC-rated if it’s touching insulation, non-IC if it’s not).
Now, some pro tips from someone who’s sold hundreds of these over the years to make your life easier. First, don’t force a bulb that doesn’t fit—no amount of jiggling will make an E14 bulb work in an E26 socket, and you’ll just break something. Measure your socket before you order if you’re unsure, or check the product page for our bulbs—we list compatible bases right there, like the E14 Led Spot Bulb is made for E14 sockets, plain and simple. Second, if you’re installing multiple spots, space them evenly—rule of thumb is 2-3 feet apart for general lighting, adjust if you want more focused light areas. Third, let the bulbs warm up for 30 seconds before checking the brightness—LEDs aren’t as instant as halogens, so don’t panic if they look dim at first. Fourth, always buy from a reputable supplier (shameless plug, I know) because cheap LEDs can have bad wiring, short lifespans, or the wrong wattage, which can be a fire hazard.
And finally, when you’re done with installation, if you love the way your recessed LED spots look and want to stock up for more rooms in your house, or for a project, we’re here to help. We work with homeowners, electricians, contractors, and everyone in between—just reach out to us for bulk pricing, custom beam angles, or any questions about which bulbs are right for your space. No pushy sales, no confusing jargon, just straight answers and quality LEDs that’ll save you money on energy for years.
Wait, a quick recap to make sure you didn’t miss anything: turn off power, pick the right bulb with the right base and beam angle, connect wires correctly, test before securing trim, watch for dimmer compatibility issues. That’s it. No need to be a genius, just follow the steps, take your time, and don’t rush the wire connections—loose wires are the #1 cause of installation headaches.
At the end of the day, installing LED recessed spots is one of the easiest, most impactful upgrades you can make to your home. You’ll get better light, lower bills, and that modern, clean look that makes any space feel nicer. If you run into any snags, or want to learn more about our line of MR16s, Ar111s, E14s, whatever—hit us up, we’re here to help. Don’t guess, just ask.
References:
- National Electrical Code (NEC) guidelines for recessed lighting installation, 2023 Edition
- Energy Star: LED Recessed Lighting Installation Best Practices, accessed 2024
- Product compatibility data for MR16, Ar111, and E14 LED spots, official manufacturer specifications
- DIY Network: Step-by-Step Recessed Lighting Bulb Replacement, 2022